Pages

Sample Text

walle

Labels

Search

Introducing San Francisco History of the Tower of London Grand Central Station Visitors Guide

Ads 468x60px

About Me

My Photo
Welcome to my blog! I am a Christian, a wife, and a homeschooling mom to three happy, fun, sweet kiddos. Life can get pretty busy, but I want to be intentional about the time I have each and every day. I want to live without regrets so that one day I will hear well done my good and faithful servant. I hope you leave inspired, full of new ideas, and refreshed ready for your day!

Followers

Featured Posts


LinkWithin

Amazing Sponsors

This is default featured post 1 title

Go to Blogger edit html and find these sentences.Now replace these sentences with your own descriptions.

This is default featured post 2 title

Go to Blogger edit html and find these sentences.Now replace these sentences with your own descriptions.

This is default featured post 3 title

Go to Blogger edit html and find these sentences.Now replace these sentences with your own descriptions.

This is default featured post 4 title

Go to Blogger edit html and find these sentences.Now replace these sentences with your own descriptions.

This is default featured post 5 title

Go to Blogger edit html and find these sentences.Now replace these sentences with your own descriptions.

Social Icons

Search This Blog

Showing posts with label Recipes. Show all posts

Tuesday, August 30, 2011

You Say Tomato, I say Tomahto

Our garden is finally really starting to crank things out. It has been rainy followed by a very dry/hot season - not good for most of my veggies. But, my tomato plants have flourished!

We have 8 tomato plants this year - 6 Marzano (Roma  type for tomato sauce/canning), 1 Beefmaster (Hamburgers, salsa, etc), 1 cherry tomato (sweet eating). The Marzano have grown WAY beyond my expectations! They have topped out at just shy of 9 feet tall!!So, needless to say, I have a LOT of tomatoes to can & for my family to eat. 


9 foot tall Tomato Plant!

For anyone who has ever wanted to can - it can be intimidating, but trust me it isn't that hard. To actually preserve things you need to deep freeze them or can them. There are two main ways to can veggies - water bath or pressure canned. Tomatoes (and other non acidic items like veggies) need to be pressure canned so they don't spoil. Here is how you do it:
Our first real crop of the season weighted in at 20 pounds (We are processing 15 pounds worth).
1. Wash Tomatoes
2. Cut tomatoes into quarters
3. Put in Tomato Press (I used the Wiliam Sonoma Tomato Press I got for Christmas - $38). Turn the wheel and the the press does the work. The pulp & juice comes out one spot & the peels & seeds come out another. You dump the peels & seeds back through the machine a couple times to make sure you get all the good pulp!
NOTE: You do not need a tomato press, it just makes the job easier. If you don't have a press, here is how you do it: cut an "X" in the bottom of tomato, drop in boiling water for 1 minute, put in ice water for 2 minutes. The skin will easily come off. Cut & scoop out seeds. Boil in large stock put, using a fork or masher to break it up occasionally. Follow the rest of the instructions below. 

4. Put the tomato juice/pulp in large pot & simmer until it is reduced by 1/3 (for thin sauce) or 1/2 (for thick sauce)
5. Sterilize your canning jars, lids & lid rings either on the quick rinse cycle of your dishwasher or by putting them in boiling water for a minute.
6. Fill your sterilized jars with tomato sauce & 1 TAB lemon juice (to preserve flavor & keep from spoiling) for each Pint size (2 cups/16oz) jar. Stir with spoon. Leave 1/2"-1" room at the top.

7. Wipe off top of jar (if not the jars will be ridiculously hard to open!!
8. Put on sterilized lid & ring; tighten.
9. In pressure cooker put: rack in bottom, 3 Quarts (12 cups) boiling water, and 2 TAB white vinegar (to keep jars looking fresh). Place jars inside pressure cooker. Close lid.

10. Turn heat to high and cook until pressure indicator reads 11 pounds of pressure. Adjust heat to maintain 11 pounds of pressure.
11. Cook for 15 minutes. Turn off & move pan off of heat. Allow to thoroughly cool; don't rush it or the jars may break. Once it is cool, open the pan & put jars on towel to finish cooling.


TADA! You now have delicious, fresh tomato sauce ready to use whenever. There is no BPA leaching into your tomatoes from the cans you buy at the grocery store. You are using tomatoes in their season when they are full of nutrients! And for me, this is the first of MANY times canning this season. For my $3 pack of seeds I am going to easily yield over 100 pounds of tomatoes!


Let me know if you try it! Happy Canning! Beth

You Say Tomato, I say Tomahto

Our garden is finally really starting to crank things out. It has been rainy followed by a very dry/hot season - not good for most of my veggies. But, my tomato plants have flourished!

We have 8 tomato plants this year - 6 Marzano (Roma  type for tomato sauce/canning), 1 Beefmaster (Hamburgers, salsa, etc), 1 cherry tomato (sweet eating). The Marzano have grown WAY beyond my expectations! They have topped out at just shy of 9 feet tall!!So, needless to say, I have a LOT of tomatoes to can & for my family to eat. 


9 foot tall Tomato Plant!

For anyone who has ever wanted to can - it can be intimidating, but trust me it isn't that hard. To actually preserve things you need to deep freeze them or can them. There are two main ways to can veggies - water bath or pressure canned. Tomatoes (and other non acidic items like veggies) need to be pressure canned so they don't spoil. Here is how you do it:
Our first real crop of the season weighted in at 20 pounds (We are processing 15 pounds worth).
1. Wash Tomatoes
2. Cut tomatoes into quarters
3. Put in Tomato Press (I used the Wiliam Sonoma Tomato Press I got for Christmas - $38). Turn the wheel and the the press does the work. The pulp & juice comes out one spot & the peels & seeds come out another. You dump the peels & seeds back through the machine a couple times to make sure you get all the good pulp!
NOTE: You do not need a tomato press, it just makes the job easier. If you don't have a press, here is how you do it: cut an "X" in the bottom of tomato, drop in boiling water for 1 minute, put in ice water for 2 minutes. The skin will easily come off. Cut & scoop out seeds. Boil in large stock put, using a fork or masher to break it up occasionally. Follow the rest of the instructions below. 
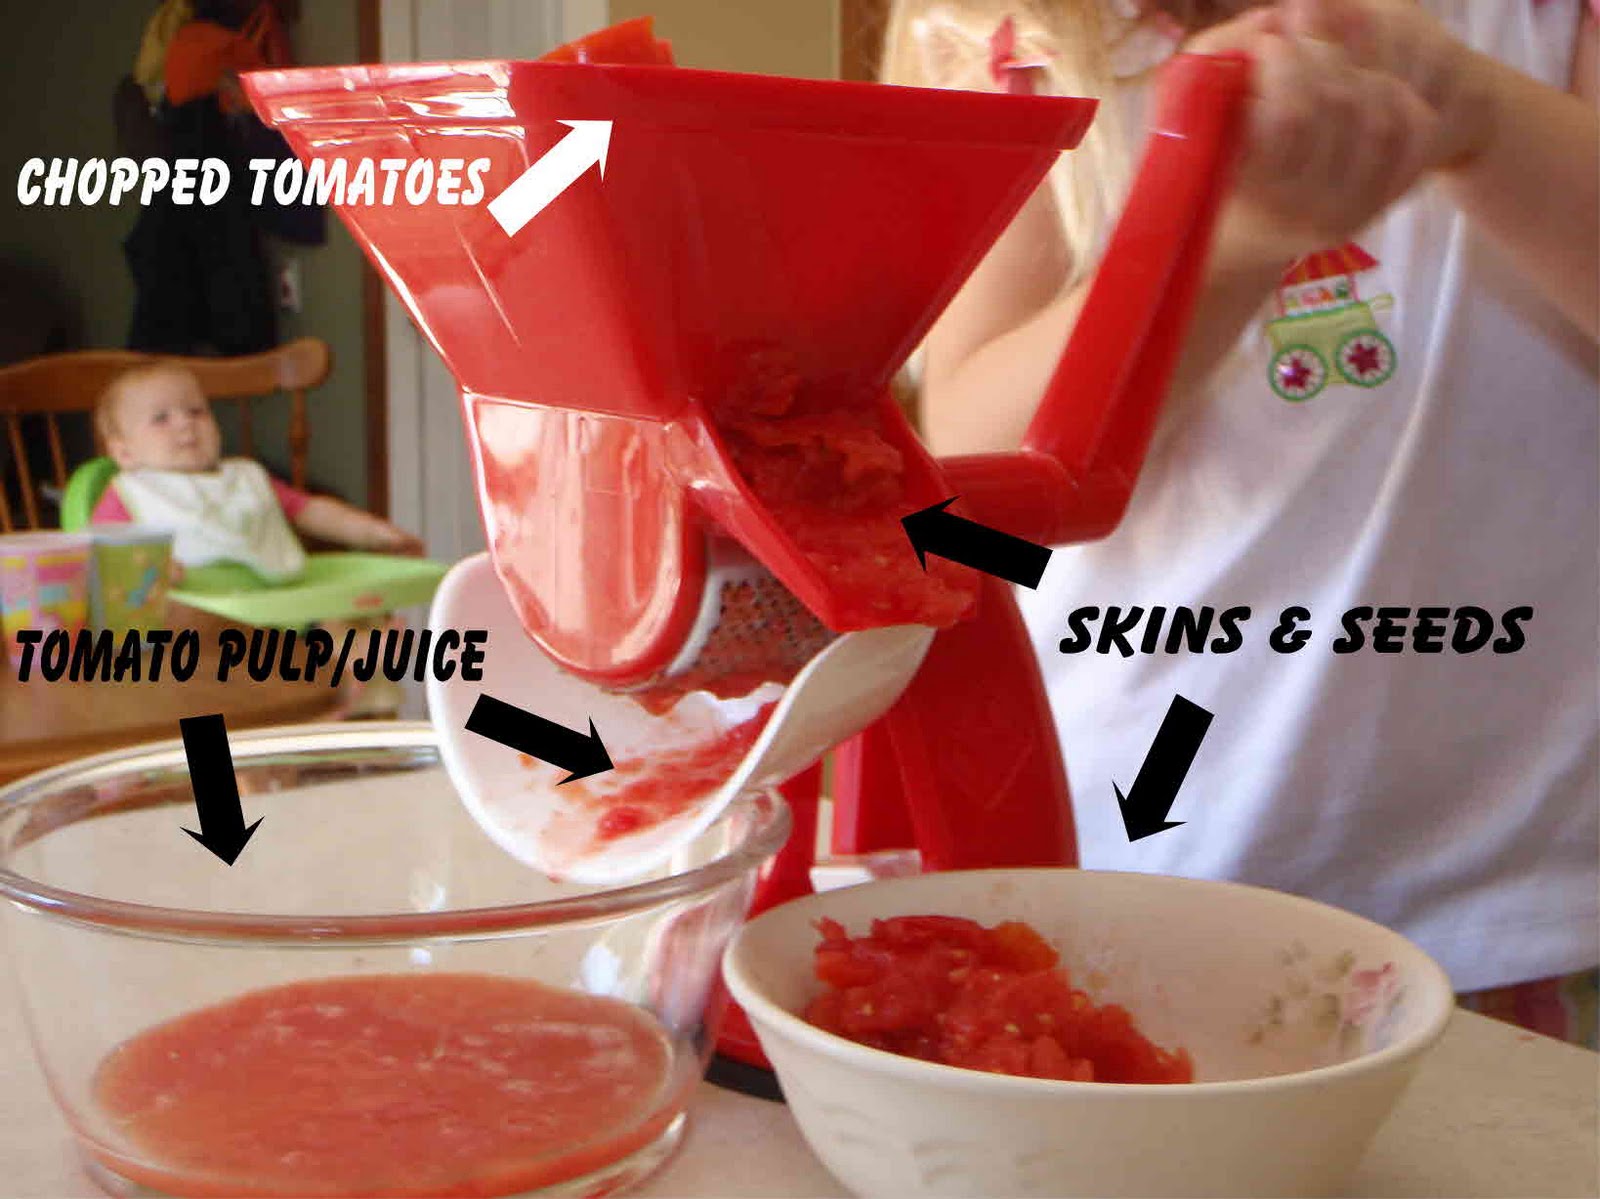
4. Put the tomato juice/pulp in large pot & simmer until it is reduced by 1/3 (for thin sauce) or 1/2 (for thick sauce)
5. Sterilize your canning jars, lids & lid rings either on the quick rinse cycle of your dishwasher or by putting them in boiling water for a minute.
6. Fill your sterilized jars with tomato sauce & 1 TAB lemon juice (to preserve flavor & keep from spoiling) for each Pint size (2 cups/16oz) jar. Stir with spoon. Leave 1/2"-1" room at the top.

7. Wipe off top of jar (if not the jars will be ridiculously hard to open!!
8. Put on sterilized lid & ring; tighten.
9. In pressure cooker put: rack in bottom, 3 Quarts (12 cups) boiling water, and 2 TAB white vinegar (to keep jars looking fresh). Place jars inside pressure cooker. Close lid.

10. Turn heat to high and cook until pressure indicator reads 11 pounds of pressure. Adjust heat to maintain 11 pounds of pressure.
11. Cook for 15 minutes. Turn off & move pan off of heat. Allow to thoroughly cool; don't rush it or the jars may break. Once it is cool, open the pan & put jars on towel to finish cooling.


TADA! You now have delicious, fresh tomato sauce ready to use whenever. There is no BPA leaching into your tomatoes from the cans you buy at the grocery store. You are using tomatoes in their season when they are full of nutrients! And for me, this is the first of MANY times canning this season. For my $3 pack of seeds I am going to easily yield over 100 pounds of tomatoes!


Let me know if you try it! Happy Canning! Beth

You Say Tomato, I say Tomahto

Our garden is finally really starting to crank things out. It has been rainy followed by a very dry/hot season - not good for most of my veggies. But, my tomato plants have flourished!

We have 8 tomato plants this year - 6 Marzano (Roma  type for tomato sauce/canning), 1 Beefmaster (Hamburgers, salsa, etc), 1 cherry tomato (sweet eating). The Marzano have grown WAY beyond my expectations! They have topped out at just shy of 9 feet tall!!So, needless to say, I have a LOT of tomatoes to can & for my family to eat. 


9 foot tall Tomato Plant!

For anyone who has ever wanted to can - it can be intimidating, but trust me it isn't that hard. To actually preserve things you need to deep freeze them or can them. There are two main ways to can veggies - water bath or pressure canned. Tomatoes (and other non acidic items like veggies) need to be pressure canned so they don't spoil. Here is how you do it:
Our first real crop of the season weighted in at 20 pounds (We are processing 15 pounds worth).
1. Wash Tomatoes
2. Cut tomatoes into quarters
3. Put in Tomato Press (I used the Wiliam Sonoma Tomato Press I got for Christmas - $38). Turn the wheel and the the press does the work. The pulp & juice comes out one spot & the peels & seeds come out another. You dump the peels & seeds back through the machine a couple times to make sure you get all the good pulp!
NOTE: You do not need a tomato press, it just makes the job easier. If you don't have a press, here is how you do it: cut an "X" in the bottom of tomato, drop in boiling water for 1 minute, put in ice water for 2 minutes. The skin will easily come off. Cut & scoop out seeds. Boil in large stock put, using a fork or masher to break it up occasionally. Follow the rest of the instructions below. 

4. Put the tomato juice/pulp in large pot & simmer until it is reduced by 1/3 (for thin sauce) or 1/2 (for thick sauce)
5. Sterilize your canning jars, lids & lid rings either on the quick rinse cycle of your dishwasher or by putting them in boiling water for a minute.
6. Fill your sterilized jars with tomato sauce & 1 TAB lemon juice (to preserve flavor & keep from spoiling) for each Pint size (2 cups/16oz) jar. Stir with spoon. Leave 1/2"-1" room at the top.

7. Wipe off top of jar (if not the jars will be ridiculously hard to open!!
8. Put on sterilized lid & ring; tighten.
9. In pressure cooker put: rack in bottom, 3 Quarts (12 cups) boiling water, and 2 TAB white vinegar (to keep jars looking fresh). Place jars inside pressure cooker. Close lid.

10. Turn heat to high and cook until pressure indicator reads 11 pounds of pressure. Adjust heat to maintain 11 pounds of pressure.
11. Cook for 15 minutes. Turn off & move pan off of heat. Allow to thoroughly cool; don't rush it or the jars may break. Once it is cool, open the pan & put jars on towel to finish cooling.


TADA! You now have delicious, fresh tomato sauce ready to use whenever. There is no BPA leaching into your tomatoes from the cans you buy at the grocery store. You are using tomatoes in their season when they are full of nutrients! And for me, this is the first of MANY times canning this season. For my $3 pack of seeds I am going to easily yield over 100 pounds of tomatoes!


Let me know if you try it! Happy Canning! Beth

Wednesday, August 24, 2011

Cookie Monster's Favorite!

I don't know about you, but as a kid I always admired the GIANT cookie cakes that Mrs. Field's had in their show cases. At $35-50 each it wasn't something we ever got, but they looked so pretty all decorated & sooooooo big! So it is no surprise that when my kiddos admired them - I decided I would make their cookie fantasy come true in our own kitchen.

Here is the recipe I used, but whatever your favorite cookie recipe is will do:


Cookie Cake

  • 2 1/4 cups flour

  • 1 teaspoon baking soda

  • 1 teaspoon salt

  • 1 cup butter, softened

  • 3/4 cup granulated sugar

  • 3/4 cup brown sugar

  • 1 teaspoon vanilla extract

  • 2 large eggs

  • 12 oz chocolate chips

Preheat oven to 375 F. Mix butter & sugars together; add eggs. Mix in salt, baking powder and vanilla; add flour. Mix in chocolate chips. Grease large pizza/cake (12") or jelly roll pan. Scoop all of the cookie dough into pan & spread. Bake 20-25 minutes. You don't want to over cook it if you want it soft in the middle! It will set some when you pull it out of the oven. Let it cool.

Decorate with your favorite frosting. For cookie cakes I use:
  • 16 oz powdered sugar

  • 3 TAB meringue powder (you can buy it at Target & it makes the frosting much fluffier - try it!)

  • 1/3 cup warm water

  • food coloring (optional)

In bowl, mix all item at medium until blended. This frosting is nice because it isn't overly sweet & it sets up to be stiff. Use piping bags to decorate. I cute mine with a pizza cutter & serve in squares or pizza slices.

It is quick (quicker than scooping out 4 dozen cookies) and soft & delicious every time. Happy Baking!
Beth

Cookie Monster's Favorite!

I don't know about you, but as a kid I always admired the GIANT cookie cakes that Mrs. Field's had in their show cases. At $35-50 each it wasn't something we ever got, but they looked so pretty all decorated & sooooooo big! So it is no surprise that when my kiddos admired them - I decided I would make their cookie fantasy come true in our own kitchen.

Here is the recipe I used, but whatever your favorite cookie recipe is will do:


Cookie Cake

  • 2 1/4 cups flour

  • 1 teaspoon baking soda

  • 1 teaspoon salt

  • 1 cup butter, softened

  • 3/4 cup granulated sugar

  • 3/4 cup brown sugar

  • 1 teaspoon vanilla extract

  • 2 large eggs

  • 12 oz chocolate chips

Preheat oven to 375 F. Mix butter & sugars together; add eggs. Mix in salt, baking powder and vanilla; add flour. Mix in chocolate chips. Grease large pizza/cake (12") or jelly roll pan. Scoop all of the cookie dough into pan & spread. Bake 20-25 minutes. You don't want to over cook it if you want it soft in the middle! It will set some when you pull it out of the oven. Let it cool.

Decorate with your favorite frosting. For cookie cakes I use:
  • 16 oz powdered sugar

  • 3 TAB meringue powder (you can buy it at Target & it makes the frosting much fluffier - try it!)

  • 1/3 cup warm water

  • food coloring (optional)

In bowl, mix all item at medium until blended. This frosting is nice because it isn't overly sweet & it sets up to be stiff. Use piping bags to decorate. I cute mine with a pizza cutter & serve in squares or pizza slices.

It is quick (quicker than scooping out 4 dozen cookies) and soft & delicious every time. Happy Baking!
Beth

Cookie Monster's Favorite!

I don't know about you, but as a kid I always admired the GIANT cookie cakes that Mrs. Field's had in their show cases. At $35-50 each it wasn't something we ever got, but they looked so pretty all decorated & sooooooo big! So it is no surprise that when my kiddos admired them - I decided I would make their cookie fantasy come true in our own kitchen.

Here is the recipe I used, but whatever your favorite cookie recipe is will do:


Cookie Cake

  • 2 1/4 cups flour

  • 1 teaspoon baking soda

  • 1 teaspoon salt

  • 1 cup butter, softened

  • 3/4 cup granulated sugar

  • 3/4 cup brown sugar

  • 1 teaspoon vanilla extract

  • 2 large eggs

  • 12 oz chocolate chips

Preheat oven to 375 F. Mix butter & sugars together; add eggs. Mix in salt, baking powder and vanilla; add flour. Mix in chocolate chips. Grease large pizza/cake (12") or jelly roll pan. Scoop all of the cookie dough into pan & spread. Bake 20-25 minutes. You don't want to over cook it if you want it soft in the middle! It will set some when you pull it out of the oven. Let it cool.

Decorate with your favorite frosting. For cookie cakes I use:
  • 16 oz powdered sugar

  • 3 TAB meringue powder (you can buy it at Target & it makes the frosting much fluffier - try it!)

  • 1/3 cup warm water

  • food coloring (optional)

In bowl, mix all item at medium until blended. This frosting is nice because it isn't overly sweet & it sets up to be stiff. Use piping bags to decorate. I cute mine with a pizza cutter & serve in squares or pizza slices.

It is quick (quicker than scooping out 4 dozen cookies) and soft & delicious every time. Happy Baking!
Beth

Wednesday, August 17, 2011

Blueberries for Sal

For our first week of Preschool we used Blueberries for Sal, a classic children's book by Robert McCloskey. The idea behind Before Five in a Row (by Jane Claire Lambert) is you read the story together every day of the week. Additionally, every day you do activities that help the kids learn & explore the book. Activities you could use for Blueberries for Sal include:
  • Retelling story by narration or pictures(reading comprehension skill)

  • Explore Blueberries (why are they good for you, where do they grow, how do they grow, canning for food later, etc.)

  • Study Bears - what they eat, hibernation (when, preparations, where, why)

  • Observation - what animals are in the story (good for memory & retention skills)

  • When was the book written? Take a look at the car & stove to see they don't look like we have now. Look up what life was like in 1948

  • Activities practicing letter B (hunt finding things around your house that start with b or find actual letter b's on books, sort buttons, stamp letter B, trace letter B with finger/sand/pudding)

There are some WONDERFUL free resources out there. Since this was my first go at it, I used a little of everything & can give you feedback on everything!

Homeschool Creations really does a bang up job! Jolanthe has put together a robust, well done pack to go along with Before Five in a Row.
We used many of this resource pack; check them out - you won't be disappointed! The resources we used are: tracing words, pre-writing practice, which one is different, rhyming match up, what letter does the picture start with, Where is Little Bear? book (big hit at our house; you paste bear behind Momma bear, below crows, etc). Find this wonderful resource at: http://homeschoolcreations.com/BlueberriesforSalPrintables.html

Delightful Learning also has a gamut of wonderful resources for Preschool & Homeschooling Moms! Michelle has a section on creative ways to teach using the letters of the alphabet as well as a section on Before Five in a Row.  You can find her resources at http://delightfullearning.blogspot.com/2010/09/blueberries-for-sal.html We used this pail; I put a number above to say how many blueberries to put in the pail & the kids put blueberry pom-poms in. Great for practicing counting! The kids LOVED it!
Before Five in a Row offers a digital download for $9 that includes: finger play, poems, songs, game cards, and crafts. Megan enjoyed the activity (right). The picture & information about bears was helpful & informative. If you don't want to have to think or pull together resources on what you are going to do this is helpful. But honestly, I was disappointed and kept thinking - I could easily find the bear information, a poem, put pom poms on math mat, and plan a game for this.  If you do use it the blueberry paint was a bust in our house - not very blue. You can find this resource at: http://app4.websitetonight.com/projects/3/6/4/2/364231/Before_Fold-and-Learn_.html 

LapbookingThe Old Schoolhouse Store also offers packs to supplement. They are not produced by Five in a Row, they are done by Hands of a Child. These offer packs to make lapbooks - a new concept to me, but common in homeschooling. These are great to put a variety of visuals & games regarding a topic or book. You can display or reference them, but they don't take up wall space. Plus, they are a lot of fun to make. My personal thought is this resource looked expensive. But I have their resource for Peter Rabbit and it looks excellent. With the cost being around $20, I would be more selective as to which books I would purchase this resource for. (Note: the resource comes already printed. Not an immediate download for those needing instant gratification, but you won't waste colored card stock or ink printing these either!) You can also be creative & make your own lapbook!

More Fun Ideas:
  • Pick blueberries

  • Pretend you are bears & act out preparing spot to hibernate (like under table)

  • Make blueberry goodies: Jam, syrup, muffins, cake, or pork chops. Here is our super easy & delicious

Blueberry Syrup Recipe
1/2 cup sugar                     1/4 cup water
1/4 cup light corn syrup        1 TAB cornstarch
2 teas lemon juice              2 cups blueberries

Stir together all ingredients in a large microwave safe bowl. Microwave on full power 5 minutes. Stir & serve warm!

It was a great week. Blueberries for Sal is rightly a classic. It is a sweet story with a lot to unpack if you want to. The simple black & white illustrations are timeless. Whether you unpack the book over a week like we did or not, don't miss reading this classic! Here are some other books we enjoyed reading to supplement our learning & exploration of Blueberries for Sal.
    

If this helped or inspired you, let me know!
Beth

Blueberries for Sal

For our first week of Preschool we used Blueberries for Sal, a classic children's book by Robert McCloskey. The idea behind Before Five in a Row (by Jane Claire Lambert) is you read the story together every day of the week. Additionally, every day you do activities that help the kids learn & explore the book. Activities you could use for Blueberries for Sal include:
  • Retelling story by narration or pictures(reading comprehension skill)

  • Explore Blueberries (why are they good for you, where do they grow, how do they grow, canning for food later, etc.)

  • Study Bears - what they eat, hibernation (when, preparations, where, why)

  • Observation - what animals are in the story (good for memory & retention skills)

  • When was the book written? Take a look at the car & stove to see they don't look like we have now. Look up what life was like in 1948

  • Activities practicing letter B (hunt finding things around your house that start with b or find actual letter b's on books, sort buttons, stamp letter B, trace letter B with finger/sand/pudding)

There are some WONDERFUL free resources out there. Since this was my first go at it, I used a little of everything & can give you feedback on everything!

Homeschool Creations really does a bang up job! Jolanthe has put together a robust, well done pack to go along with Before Five in a Row.
We used many of this resource pack; check them out - you won't be disappointed! The resources we used are: tracing words, pre-writing practice, which one is different, rhyming match up, what letter does the picture start with, Where is Little Bear? book (big hit at our house; you paste bear behind Momma bear, below crows, etc). Find this wonderful resource at: http://homeschoolcreations.com/BlueberriesforSalPrintables.html

Delightful Learning also has a gamut of wonderful resources for Preschool & Homeschooling Moms! Michelle has a section on creative ways to teach using the letters of the alphabet as well as a section on Before Five in a Row.  You can find her resources at http://delightfullearning.blogspot.com/2010/09/blueberries-for-sal.html We used this pail; I put a number above to say how many blueberries to put in the pail & the kids put blueberry pom-poms in. Great for practicing counting! The kids LOVED it!
Before Five in a Row offers a digital download for $9 that includes: finger play, poems, songs, game cards, and crafts. Megan enjoyed the activity (right). The picture & information about bears was helpful & informative. If you don't want to have to think or pull together resources on what you are going to do this is helpful. But honestly, I was disappointed and kept thinking - I could easily find the bear information, a poem, put pom poms on math mat, and plan a game for this.  If you do use it the blueberry paint was a bust in our house - not very blue. You can find this resource at: http://app4.websitetonight.com/projects/3/6/4/2/364231/Before_Fold-and-Learn_.html 

LapbookingThe Old Schoolhouse Store also offers packs to supplement. They are not produced by Five in a Row, they are done by Hands of a Child. These offer packs to make lapbooks - a new concept to me, but common in homeschooling. These are great to put a variety of visuals & games regarding a topic or book. You can display or reference them, but they don't take up wall space. Plus, they are a lot of fun to make. My personal thought is this resource looked expensive. But I have their resource for Peter Rabbit and it looks excellent. With the cost being around $20, I would be more selective as to which books I would purchase this resource for. (Note: the resource comes already printed. Not an immediate download for those needing instant gratification, but you won't waste colored card stock or ink printing these either!) You can also be creative & make your own lapbook!

More Fun Ideas:
  • Pick blueberries

  • Pretend you are bears & act out preparing spot to hibernate (like under table)

  • Make blueberry goodies: Jam, syrup, muffins, cake, or pork chops. Here is our super easy & delicious

Blueberry Syrup Recipe
1/2 cup sugar                     1/4 cup water
1/4 cup light corn syrup        1 TAB cornstarch
2 teas lemon juice              2 cups blueberries

Stir together all ingredients in a large microwave safe bowl. Microwave on full power 5 minutes. Stir & serve warm!

It was a great week. Blueberries for Sal is rightly a classic. It is a sweet story with a lot to unpack if you want to. The simple black & white illustrations are timeless. Whether you unpack the book over a week like we did or not, don't miss reading this classic! Here are some other books we enjoyed reading to supplement our learning & exploration of Blueberries for Sal.
    

If this helped or inspired you, let me know!
Beth